
Chick Care Instructions : A Guide to the Care of Baby Chicks
- Arrival
- After 4 Weeks
- Baby Turkeys & Peafowl
- Ducks & Goslings
- Quail, Pheasants & Guineas
- Safe Handling of Poultry
- Samples of Brooding Chicks
- The Doctor is In!
- Poultry Diseases/Sickness and Treatments/Management
- Fast Tips for Mail Ordered Chicks that may have had a stressful trip
- Session with the Chicken Doctor
Arrival Date
- You must provide a heat source capable of maintaining a warm zone of 100-105°F in the brooder for the first 48 hours.
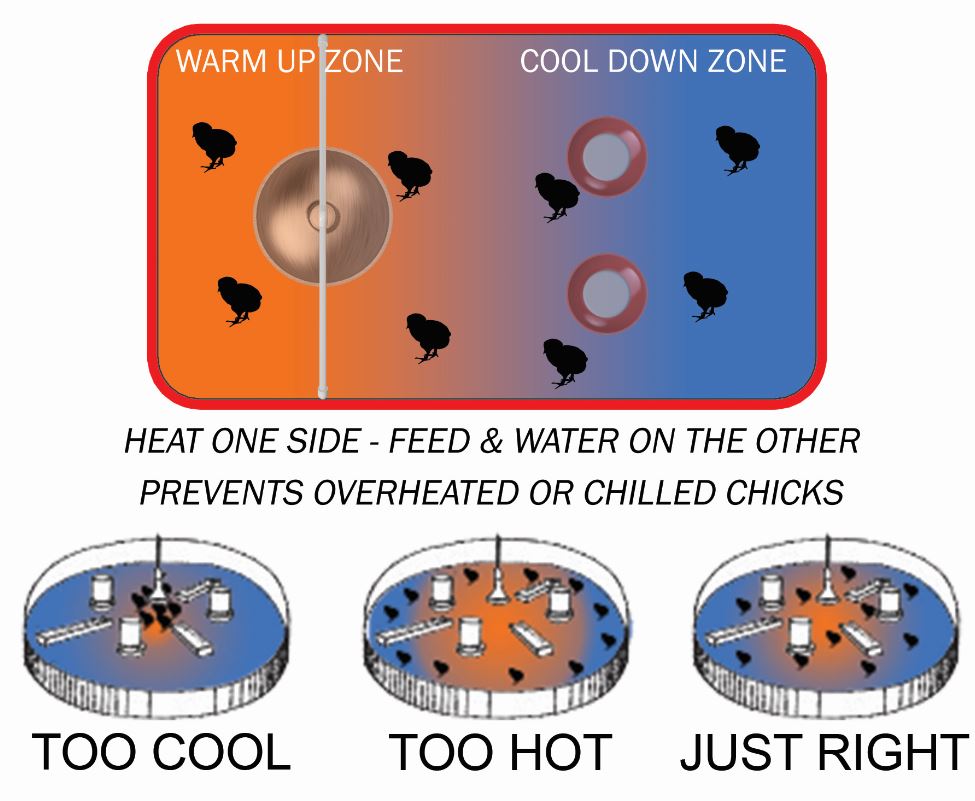
- A cooler zone must also be available so chicks can regulate their temperature.
- We do not recommend using heat plates for the first two weeks of raising mail-ordered chicks, as they do not reach a sufficient temperature for chicks that have been in transit.
- Puppy pads are not recommended as bedding for poultry.
- No totes or tubs, as they are too small for a cool down area.
- Please review all our “Care of Chicks on Arrival” instructions below to ensure proper setup and care.
One thing to always keep in mind when you raise chicks year after year; you will always run into something different. Just because you did it one way this year and didn’t experience any problems does not mean you will not experience problems in the future. We have been doing this since 1936 and still experience new and different issues each year. Please follow our basic instructions and also feel free to contact us for further information.
First Day Instructions:

- Be sure you have some flexible time to pick up your birds from the post office and make plans to be home the first day and night to watch them. Sometimes the chicks do not arrive when expected.
- Have your brooder area set up and heating source tested. This will ensure the birds can go straight into the brooder as soon as they arrive.
- Refrain from handling or playing with the birds the first 24 hours. This is an extremely important step. Your chicks will need the time to calm down from the stress of the trip.
- First couple of weeks should be in a room that is between 60-80°F constant temperature with no known draft.
We recommend for the 1st day to have the drinking water at 90-105 degrees (or very warm). The birds are small with little weight on them upon arrival. They will drink a lot of water, which if too cool, will rapidly reduce their body temperature, put them into shock and make them sick.
- When placing the birds in the brooder, take each in your hand and hold their head between your fingers. Do a quick dip of the chick’s beak into the water, and then let go of the chick. You should see the chick look up and start swallowing. Do not repeat once the chick has grasped the technique.
Normally, the chicks will NOT start to drink, eat, or move around until their body has warmed. At floor level, the temperature needs to be 100°-105°F directly under the heat source for the first few days. Then the temperature should be lowered to 100°F for the rest of the week.
Be sure to have plenty of room available for the chicks to walk away from the heat source in case they become too warm. Lay paper towels on the brooder floor sprinkled evenly with food. This has been known to help them recognize their food. Remove the paper towel once the chicks catch on and show interest in the feeder. This method should ONLY be used the first day.
Heating Instructions:

Always use brand new bulbs. We have found that using a drop light with reflector shield is a good source of heat to get them started for the first couple of critical days.
- Use a 125 watt bulb.
- A guide is one brooder lamp per 25 chicks.
- Hang a reflector light from something secure to ensure that it does not fall and hurt the birds or burn anything. Lower or raise the lamp to acquire the current temperature at floor level.
- Make sure to use a thermometer at floor level under the light to be accurate.
- Again, make sure there is plenty of room for the chicks to walk away from the heat source.
Mail order poultry is entirely different than poultry hatched out in an incubator at home or under a hen. Mail order poultry require much more heat initially for the first 2 weeks than a heat plate generally can provide. Mail order chicks need their body temperature rapidly and artificially warmed up to 104 degrees (which is a mother hen’s temperature). Most heat plates do not do this.
EXCEPTION!
The temperature may need to be slightly higher (+5 Degrees) for Bantams and other small bodied birds. Whereas the temperature may need to be slightly lower for Jumbo Cornish Cross as they grow faster than others and will overheat more quickly.
Feed First Day Instructions:
- Use a chick starter/grower feed.
Put the feed in troughs low enough so that the chicks can see and reach it easily. Use one foot of trough feeder or one round feeder for every 25 chicks. Never let the chicks run out of feed.
Adding crumbled boiled egg yolk on top of the feed gets the chicks off to a good start and will also encourage them to start eating feed right away. It is important to remove all uneaten boiled eggs after 2-4 hours. We do not recommend adding grit, because the chick starter/grower feed is formulated for what the chicks need to digest the food. Chicks should stay on a full feed ration of chick starter/grower until they have laid their first egg.
EXCEPTION!
You should limit feed intake on the Jumbo Cornish Cross starting at the 14th day by taking the feed away at night. This seems to help slow the growth of the bird just enough to allow the skeletal structure of the bird to catch up with their fast muscular development.
Water Instructions:

Start with a 1 gallon low profile chick waterer for each group of 25-50 chicks. Do not medicate water the first eight hours.
The first water given to new arrived chicks should be very warm at 90-105°F. The next 2 days, the water should be warm, and by the 3rd day it should be room temperature.
Your chicks will be thirsty when they arrive in the mail. A taste of water right away will help them find more water soon. Dip the beak of each chick into the warm water before you turn your chicks loose.
Most baby chick loss is caused by the chick not starting to eat or drink due to them being too cold to move. Never let your chicks run out of water.
SPECIAL SITUATIONS AFTER THE CHICKS ARRIVE
If the Chicks Had a Hard Trip:
If the birds are lethargic, acting listless or have manure pasting up try this:
4 tablespoons of Raw Organic Apple Cider Vinegar (with the mother) to every quart of water for 3-5 days. To help chicks recover from a rough trip, hardboil a few eggs and take just the yolk and crumble over their feed to help give them an energy boost.
The stress of shipping can also cause the manure to stick to the back of the chick. If the chick becomes backed up, it could result in fatality. It is important to remove this daily. Pull off gently using a warm wash cloth.
Medication:
Another option to help alleviate these symptoms is Amprol. You should be able to find it at your local feed store or at cackleshatchery.com.
Space:
Try to provide ½ square foot per chick at the start. For starting 50 chicks, use a draft shield and make a circle about 5 to 6 feet across. For 100 chicks, make a circle 7 to 8 feet across. The area needs to have a heater at one side of the brooder to warm up, and an area to cool off and play.
Litter Instructions:
Large pine shavings will make a good litter. Rice hulls, dry straw, or hay can also make good bedding. Do not use small shavings or sawdust. The baby chicks that are learning to eat will eat it and possibly die. Do not use sand, because it can also be eaten by the birds, and cause their craw to have impaction.
The pine shavings should cover the floor and be at least 1 to 2 inches thick. On concrete floors, use 3-5 inches of bedding.
Do not use cedar or cypress shavings as they are highly toxic to poultry.
Picking Prevention & Care:
It is very common for birds to use their own beak to groom or pick themselves. Baby chicks are prone to pick each other for numerous reasons, including if the temperature is too hot, the area is too crowded, they are without fresh air, or when they are bored. Bright lights can also cause them to pick; changing to a red light will help.
To treat chicks that have been injured due to picking, smear some type of menthol ointment (such as Vicks Vapor Rub) on the area that has been injured, and keep up the treatment until healed.
2. After 4 Weeks
- Increase floor area to 3-4 square feet per bird.
- Increase feeders to provide 2 ½ to 3 inches of space per bird.
- Increase waterers to one 5-gallon fount per 100 chicks or install a nipple system.
- Install roosts at back of brooder area. Start roost poles low and gradually raise from floor.
- Allow 4 inches width per bird and 6 inches apart.
- Open windows during the day. Leave only partly open at night.
- Prevent water puddles around founts.
- Place founts on low wire platform. Move founts periodically to keep area dry and prevent Coccidiosis.
- Birds can range outside on warm, sunny days but only if a clean range is available.
3. Baby Turkeys & Peafowl
Use the basic instructions above but watch more carefully as turkeys and peafowl tend to chill quicker than chicks. They can also pile up for no reason. Keep a close eye on them to prevent this. Baby turkeys and peafowl need to be taught where feed and water are.
It is helpful to put colored marbles in the water founts and sprinkle some feed on paper towels for the first few days. DO NOT use any slick paper for bedding for turkeys and peafowl to prevent spraddle legs.
4. Ducks & Goslings
Follow the same care as for baby chicks except ducks and goslings do not need as much heat due to rapid growth. They will require more care as they are messier with water.
DO NOT let baby ducks and goslings out on a pond until fully feathered (2-3 months) as their down absorbs water and they can drown.
5. Quail, Pheasants & Guineas
Use basic chick instructions; however, watch them closely for piling up. The temperature may need to be slightly higher for smaller-bodied game birds.
Add clean gravel or marbles to water founts to prevent drowning. Use a red bulb to control cannibalism.
6. Safe Handling of Poultry

Live animals and pets can be a source of potentially harmful microorganisms (germs including salmonella and bacteria). Always wash your hands with soap and warm water after handling animals.


8. The Doctor is In!

“My Chickens Are Sick” / “I Need A Chicken Doctor”
Although Cackle Hatchery® is not a veterinarian, we provide excellent information and health advice.
10. Fast Tips for Mail Ordered Chicks
- Schedule your day so you can monitor chicks for the first 24 hours.
- Have the brooder heated to 100°F before arrival.
- Use 98°F warm water for the first 2 hours and dip their beaks.
- Do a 7-day dose of Amprol in water after arrival to prevent Coccidiosis.
- If manure pastes up, clean daily with a warm moist washcloth.
11. Session with the Chicken Doctor
One-time consult fee with Peter Brown AKA “THE CHICKEN DOCTOR,” a chicken expert with over 50 years of helping thousands of poultry enthusiasts with their poultry problems.
As a general rule, Cackle Hatchery can help you with your baby chick care issues and the paid consultation can help you with started or grown poultry issues, diseases, vaccinations or more detailed chicken care issues.
